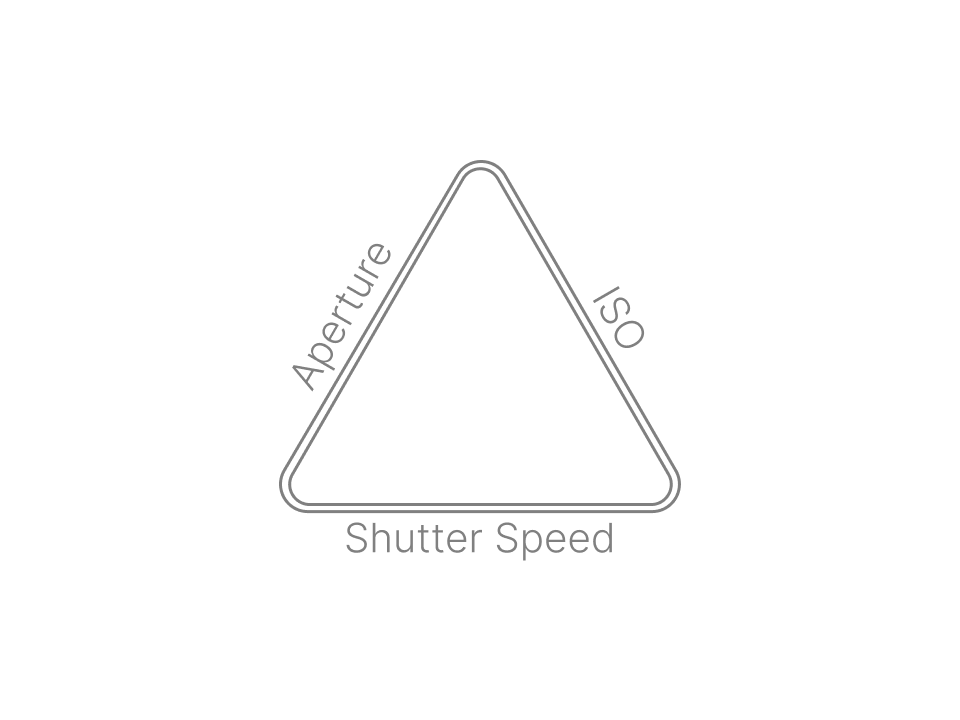
The Exposure Triangle
Aperture, shutter speed, and ISO make up the three sides of the exposure triangle. They work together to produce a photo that is properly exposed. If one variable changes, at least one of the others must also change to maintain the correct exposure. For more information on this topic, you may which to check out our detailed summary of exposure.
Stop!
Before we go too far, let’s start our discussion by talking about a stop of light. Understanding what a stop is is key to understanding the exposure triangle. In photography, a stop refers to the doubling or halving of the amount of light that makes up an exposure. Each photo that we take requires a certain quantity of light to expose it correctly. Adding a stop of light by doubling the exposure will brighten an underexposed image. Conversely, decreasing an exposure by one stop (halving the amount of light) will darken an overexposed image.
So how do you add or take away a stop of light? To do this, we need to change the aperture, shutter speed, and/or ISO. Let us look at each of these individually.
Shutter Speed
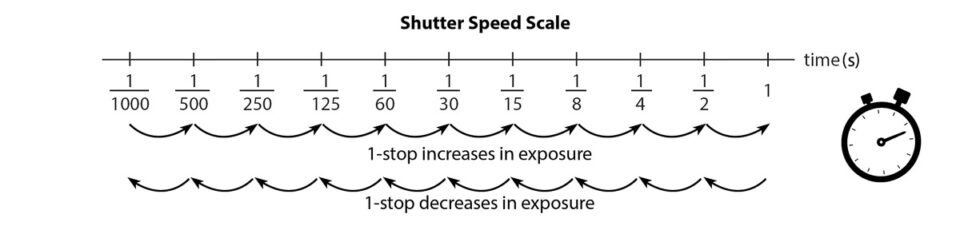
Shutter speed is the length of time light is allowed to hit the sensor. It is measured in seconds and could be 1⁄₁₀₀ of a second, or 1⁄₁₀ of a second, or three seconds, or five minutes.. Shutter speed is probably the easiest of the exposure triangle sides to understand. To double the amount of light, we need to double the length of the exposure. For example, moving from a shutter speed of 1⁄60s to 1⁄30s will add a stop of light because the shutter will remain open twice as long. Changing from a shutter speed of 1s to 1⁄8s will decrease the exposure by three stops. Why? From 1s to 1⁄2s is one stop. Then 1⁄2s to 1⁄4s is another stop. Finally, 1⁄4s to 1⁄8s is a further halving of the time the shutter remains open or the third stop.
So, why does shutter speed really matter? There are two main reasons:
First, as you would expect, a long shutter speed (several seconds) lets in a large amount of light. If you take a normal daytime photo with a 30second shutter speed, you will capture an image that is completely white. The opposite is true, too; a quick shutter speed only lets in a small amount of light. If you take a photo at night with a 1⁄₈₀₀₀ second shutter speed, the photo will be completely black.
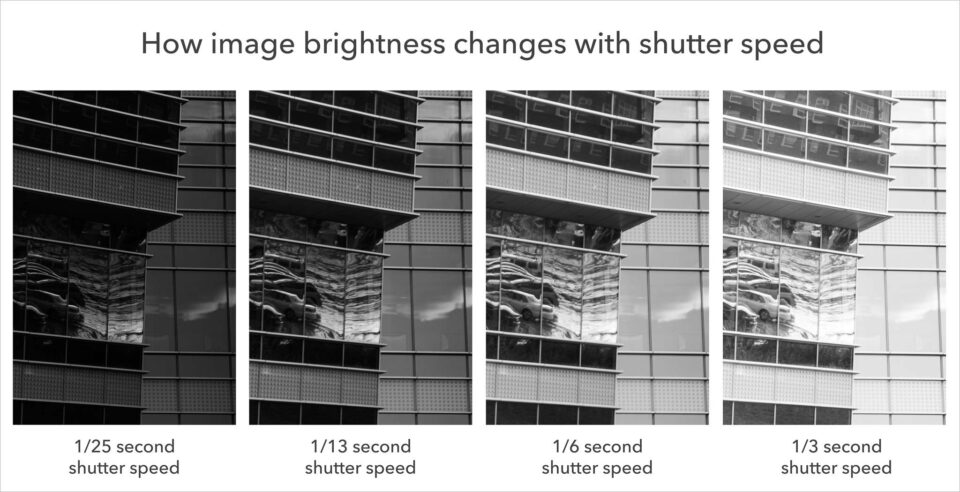
Take a look at the series of examples below. Here, 1⁄₂₅ second was too dark (“underexposed”), and 1⁄30 second was too bright (“overexposed”). This should give you an idea of the brightness differences with shutter speed:
Second, the only other big effect is the motion blur in your images. Not surprisingly, a long shutter speed (such as five seconds) captures anything that moves during the exposure. If a person walks by, they might appear as a featureless streak across the image, since they aren’t in one place long enough for the long exposure to capture them sharply. That’s called motion blur.
By comparison, a quick shutter speed (such as 1⁄₁₀₀₀ second) does a much better job freezing motion in your photo — even something moving quickly. You can photograph a waterfall at 1⁄₁₀₀₀ second and see individual droplets frozen in midair. Without a camera, they might have been invisible.
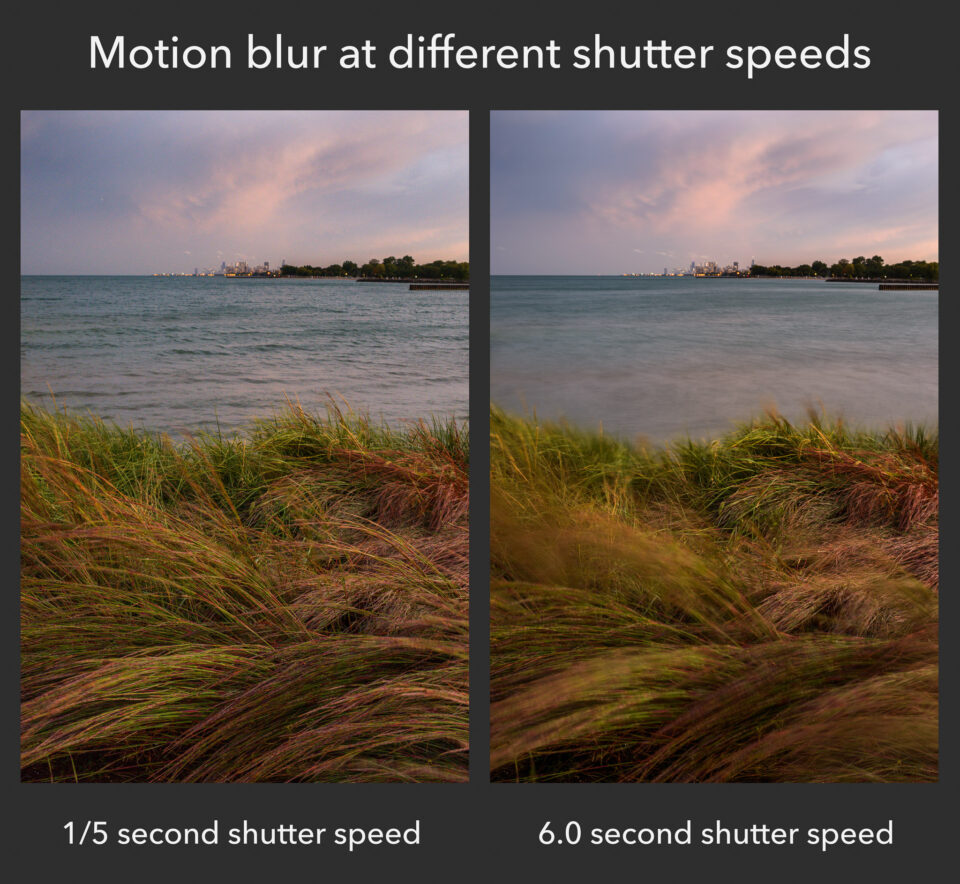
Take a look at the images below. Here, I was taking pictures on a windy day. The foreground grass and the waves behind them were all moving quickly. As you can see, depending upon my shutter speed, there was a major difference in motion blur:
There are two types of motion blur that you may encounter due to your shutter speed: camera blur and subject blur.
If you’re doing handheld photography, camera blur could be very significant. It’s impossible to hold your camera perfectly still while you’re taking a picture, and even slight shake can lead to very blurry photos. That’s one reason why many photographers end up using tripods!
However, although a tripod protects against camera movement, it does nothing to prevent scene movement. For example, if you’re taking landscape photos on a windy day – even with a tripod – you might end up with areas of blurriness, as in the image above. This is called subject blur.
Sometimes, you can use camera or subject blur artistically, and it looks good. For example, if you’re photographing clouds as they pass through a valley, a long shutter speed might be a nice touch:
However, in many cases, you probably will want to eliminate motion blur so that your entire photo is sharp. If that’s your goal, you need to pick a shutter speed that is quick enough to freeze any movement. So, what shutter speed should you use? Is there a good range that tends to provide sharp photos of moving subject?
Not really, because it all depends upon some outside factors – most importantly, the amount of movement in your scene. If your subject is moving very quickly, you’ll need a fast shutter speed. If your subject is standing still, or only moving very slowly, you can get away with a longer shutter speed.
Also, the farther you zoom in (i.e., the longer your “focal length”), the more you’ll magnify motion blur. So, you’ll find that you generally need quicker shutter speeds to freeze motion properly when you’re using something like a telephoto lens.
The best route to learn all of this is just to keep practicing. Over time, you’ll build a good mental picture of the shutter speeds you can use in a particular environment without risking motion blur. Whether that’s 1/250 second, 1/10 second, or 20 seconds, it’ll be second nature. Also, after you’ve taken a picture in the field, review it and see if there is any blur when you zoom in. If so, you’ll need a quicker shutter speed.
Want a quick-and-dirty guideline? Use 1/500 second or faster for sports and wildlife action. Use 1/100 second or faster for telephoto portrait images. Use 1/50 second or faster for wider-angle portrait or travel photos where your subject isn’t moving too much. If your subject is completely still, and you have a tripod, use any shutter speed you want.
These are very general suggestions, but they are a good place to start. However, your goal should be to outgrow these tips and develop your own mental model instead. Shutter speed is one of the most intuitive aspects of exposure, and a bit of practice will be enough to help your photographs improve significantly.
Aperture
Aperture Aperture is very similar to the “pupil” of your camera lens. Just like the pupil in your eye, it can open or shrink to change the amount of light that passes through. This is how the aperture blades look on a typical lens:
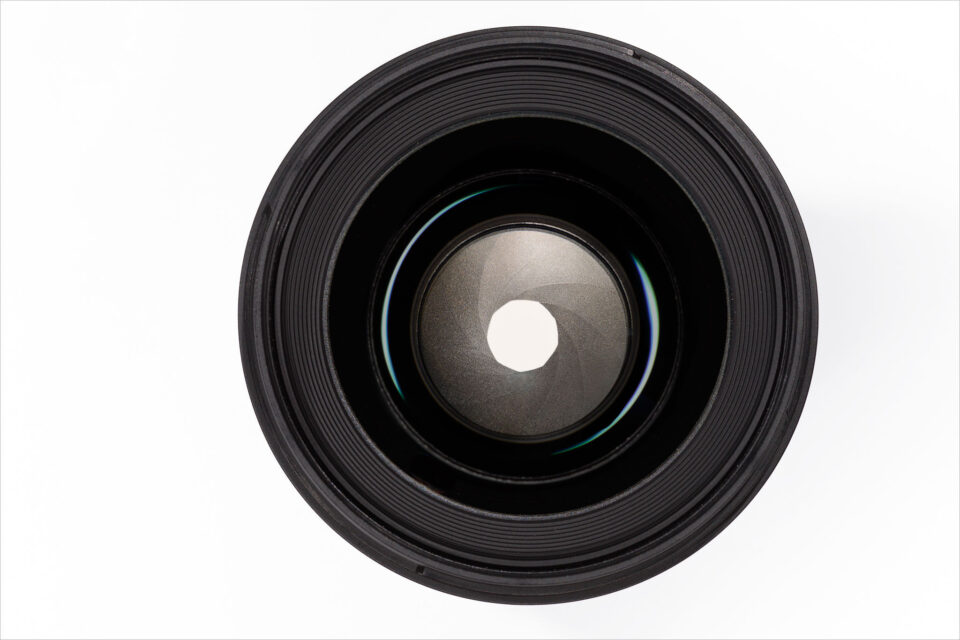
Aperture refers to the size of the circular hole in the lens that lets in light. The bigger the hole, the more light that reaches the sensor. In fact, each time you double the area of that opening, you double the amount of light or increase the exposure by one stop. On the other hand, if you half the area of the opening, you half the amount of light hitting the sensor. And you guessed it; that will decrease the exposure by one stop.
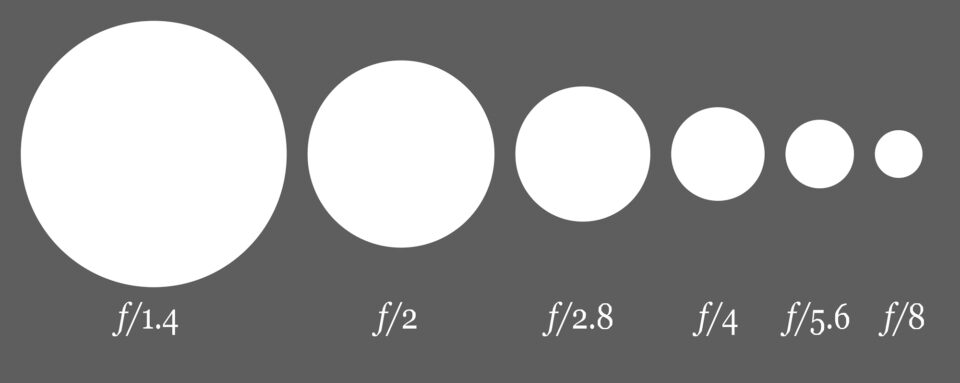
Aperture blades work a lot like the pupil in your eyes. At night, your pupils dilate so you can see things more easily. The same is true for aperture. When it is dark, you can open the aperture blades in your lens and let in more light. Aperture is written as f/Number. For example, you can have an aperture of f/2, or f/8, or f/16, and so on. Typically, the largest aperture you can set will be something like f/1.4, f/1.8, f/2, f/2.8, f/3.5, f/4, or f/5.6. It changes from lens to lens. The smallest aperture on most lenses is something like f/16, f/22, or f/32`. This diagram demonstrates the relative sizes of various aperture settings:
The larger your aperture, the brighter your photo – the more light you capture. Again, your pupils work just like this, too; they open or close to let in different amounts of light. So, when you are trying to expose a photo properly, it is crucial to pay attention to your aperture setting.
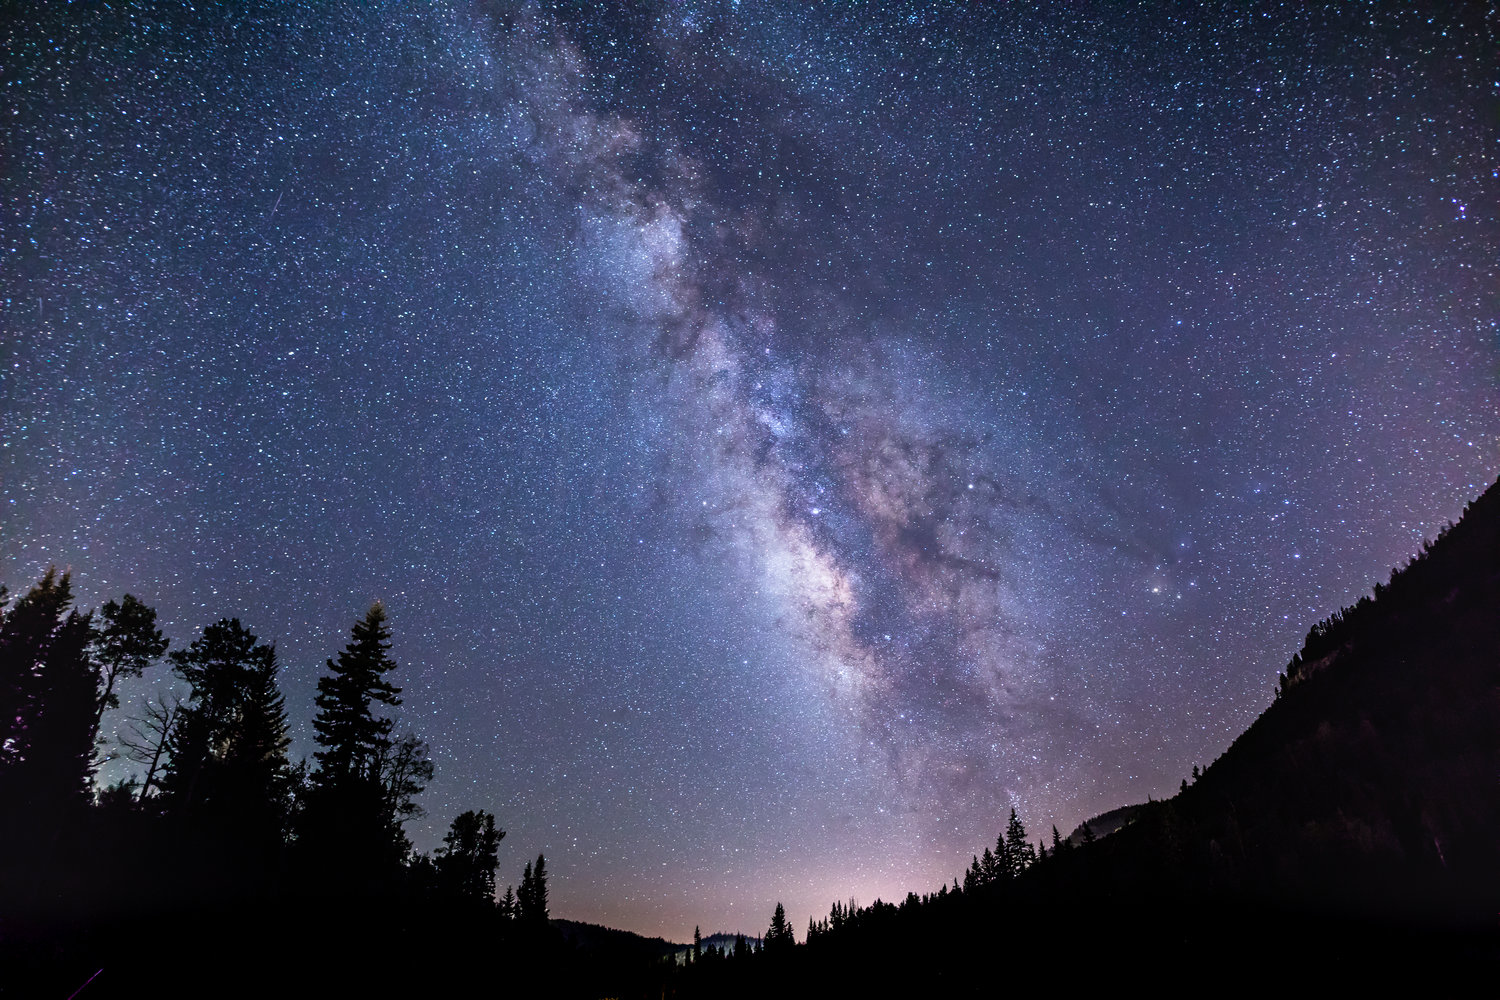
A large aperture lets in more light. Apertures like f/1.4 and f/2 practically let you see in the dark. On the flip side, a small aperture like f/16 (with nearly closed aperture blades) lets in far less light. If you try to photograph Milky Way at f/16, your final image will be essentially black.
By changing your aperture and shutter speed settings, you can capture exactly the amount of light you want – resulting in a photo with the proper exposure. That is what makes aperture so powerful.
Aperture and exposure
The larger your aperture, the brighter your photo – the more light you capture. Again, your pupils work just like this, too; they open or close to let in different amounts of light. So, when you are trying to expose a photo properly, it is crucial to pay attention to your aperture setting.
A large aperture lets in more light. Apertures like f/1.4 and f/2 practically let you see in the dark. On the flip side, a small aperture like f/16 (with nearly closed aperture blades) lets in far less light. If you try to photograph Milky Way at f/16, your final image will be essentially black.
By changing your aperture and shutter speed settings, you can capture exactly the amount of light you want – resulting in a photo with the proper exposure. That is what makes aperture so powerful.
Aperture and Depth of Field
The other important effect of aperture is on depth of field.
Depth of field is the amount of your scene, from front to back, that appears sharp. In a landscape photo, your depth of field might be huge, stretching from the foreground to the horizon. In a portrait photo, your depth of field might be so thin that only your subject’s eyes are sharp.
Aperture changes your depth of field, which makes a big difference if you want to capture the best possible photographs. Changing the depth of field in an image will alter the way it looks completely.
To be specific, small apertures (like f/11 or f/16) give you a large depth of field. If you want everything from front to back to appear sharp, those are good settings to use. Large apertures (like f/1.4 or f/2.8) capture a much thinner depth of field, with a shallow focus effect. They are ideal if you are trying to isolate just a small part of your subject, making everything else blurred.
Here is a sample comparison:
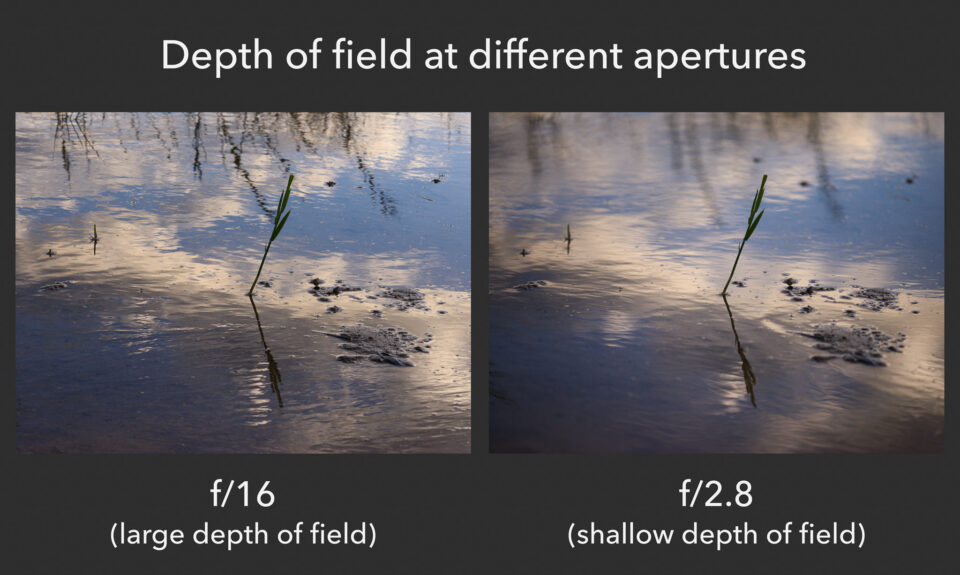
As you can see, that is a significant difference. The photograph on the left has a larger depth of field, which means that more of the scene appears sharp from front to back. However, the f/2.8 photo on the right has a pleasant shallow focus effect. In this case, it is arguably the better image. You will save yourself a lot of difficulties if you simply memorize this relationship.
In practice, the effects are quite clear. As your aperture gets smaller and smaller, your exposure will grow darker and darker, and your depth of field will increase. (Remember, too, that you can expose the photo back to normal by using a longer shutter speed.) The more photos you take, the less you will have to think about these effects. They will become second nature.
The Aperture Scale
The shutter speed scale is easy to remember. An exposure of 1/100 second lets in twice as much light as an exposure of 1/200 second, because it is twice as long. Unfortunately, aperture is not as intuitive. This is the scale it follows instead:
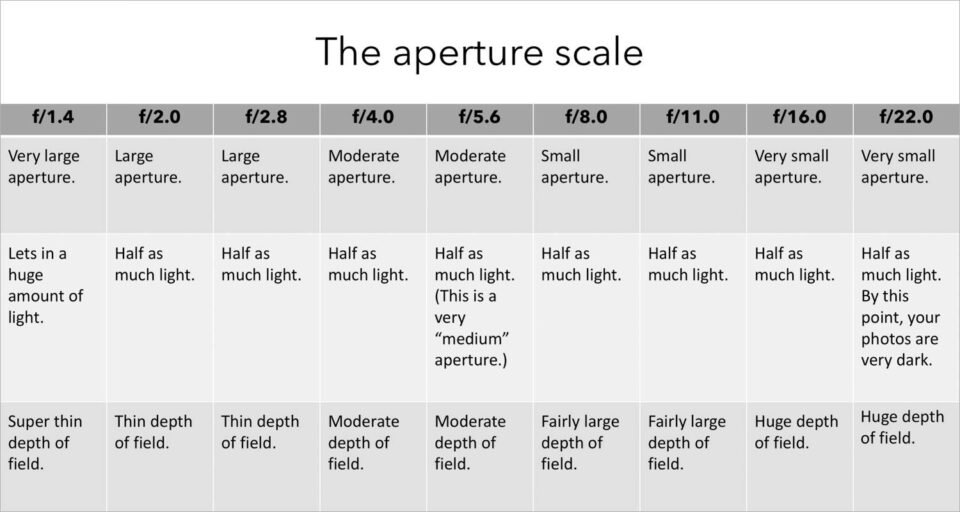
From f/1.4 to f/2.0 (or any other one-stop jump) you will capture half as much light. You also will increase your depth of field. Also, keep in mind that you might be able to set values beyond this chart, like f/32, as well as apertures between these stops, like f/6.3, depending upon your lens.
Typically, the sharpest apertures will be somewhere in the middle of the range. On most lenses, f/4, f/5.6, and f/8 are three of the sharpest apertures. However, this varies from lens to lens. In addition, sharpness should not be your main concern. It is better to have a photo with the proper depth of field, even if it means that some low-level pixels have a bit less detail.
If you want to learn more about this topic, take a look at Photography Life’s detailed articles about aperture and f-stop. Along with that, we have another article that explains every single effect of aperture, although it is a bit advanced, and it assumes you have a decent foundation already.
ISO
The final variable in the exposure triangle is ISO. You can think of ISO as the sensitivity of the digital sensor (although it is a lot more complicated than that). Higher values of ISO mean that the sensor does not need to collect as much light to make a correct exposure. Low ISO values mean that the sensor will have to gather more light to make the exposure.
ISO brightens your photos, but it is not part of your “luminous exposure” since it does not affect the amount of light that reaches your camera sensor (the definition of exposure). Instead, it merely brightens a photo in-camera after your sensor has already been exposed to the light.
It is useful to raise your ISO when you have no other way to brighten your photo – for example, when using a longer shutter speed will add too much motion blur, and you are already at your widest aperture. It is a very valuable setting to have, but it is not all good news. When you raise your ISO, your photos will be brighter, but you’ll also emphasize grain (otherwise known as noise) and discolored pixels in the images along the way.
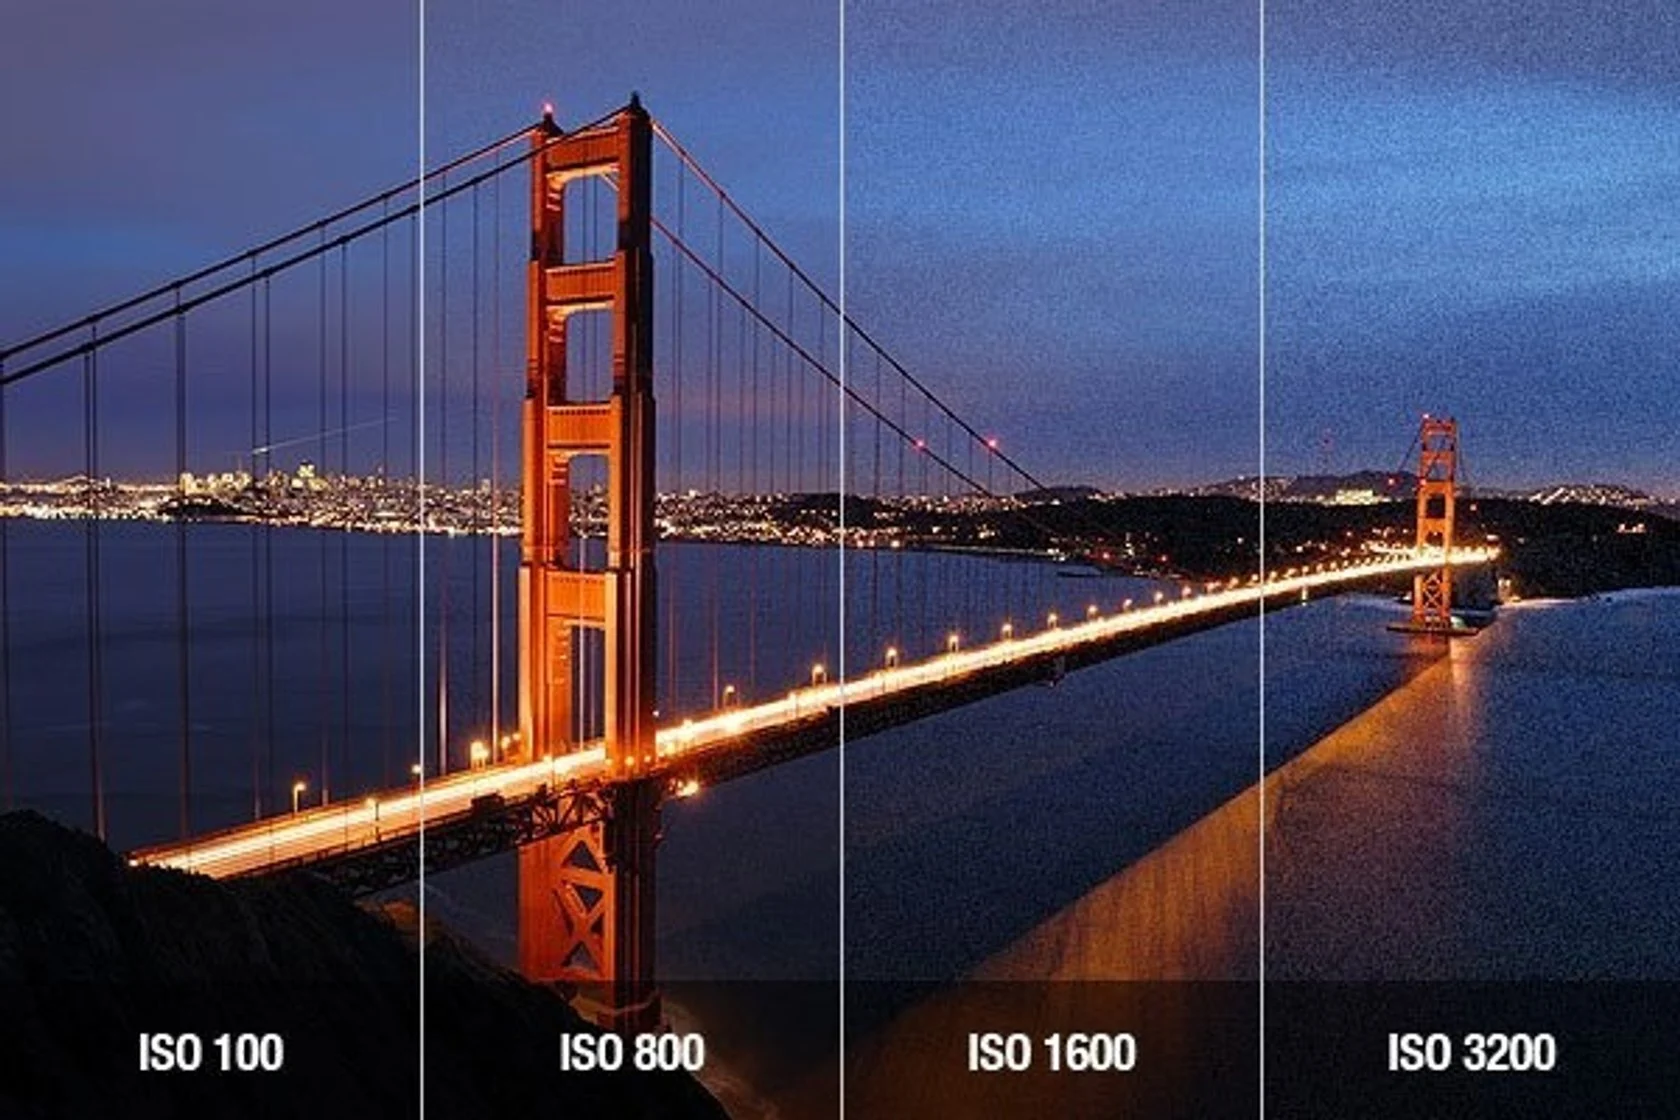
The ISO scale is easy to remember. At higher numbers, your photos will be brighter, but you also will see more and more noise. The main stops on the ISO scale are 100, 200, 400, 800, 1600, 3200, and 6400. Some cameras go beyond this range, in either direction, such as the ISO 25600**. Also, you can set intermediate ISO values at 1/3or1/2stops, such as ISO640or ISO1250`.
The lowest ISO on your camera is called the “base ISO” Typically, the base ISO will be 100, but some cameras have ISO 64, ISO 200, or something else instead. This is the lowest native ISO on your camera. If you set your base ISO and expose your photo properly, you will end up with the best possible image quality and the lowest amount of visible noise.
Take a look at the series of images below. Here, the photo on the left is at base ISO 100, and it is far too dark. By increasing the ISO, you will see the results continue to improve. Although there is some noise at ISO 1600 if you zoom into the pixels, a noisy photo is better than a picture that is too dark to use.
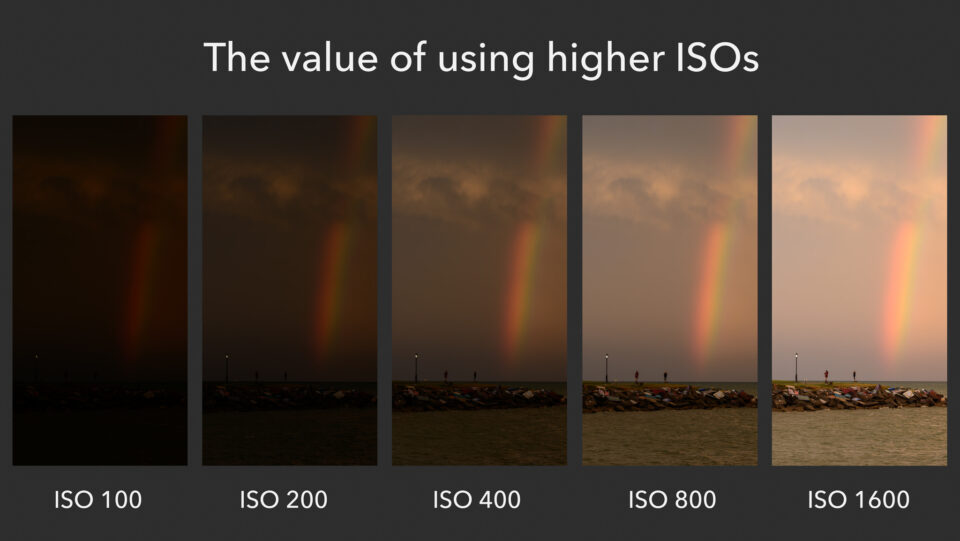
This series demonstrates why you might want to raise your ISO. Although it does make noise more visible, using a high ISO is sometimes the only way to capture a bright photo. You might be wondering how much noise exists in the ISO 1600 photo above, and the answer is that the overall amount is quite acceptable. Here is a crop from the ISO 1600 photo above:
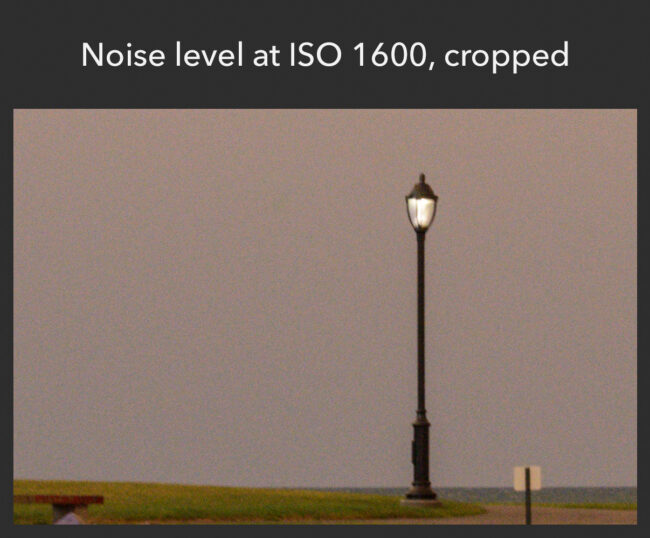
That is quite manageable. At least on this camera – and they do differ – using ISO 1600 should be perfectly fine, especially because it is possible to reduce noise to a degree in post-production. However, it still is best to use your base ISO whenever possible, capturing your photo with a brighter exposure (shutter speed and aperture) instead.
Unfortunately, you have to let in a lot of light in order to capture a well-exposed photo at ISO 100. That is fine in bright conditions, or if you are photographing a nonmoving scene from a tripod (since tripods let you use longer shutter speeds). But it will not always work. That’s why ISO adjustments are so powerful, and why they have such an important effect on your exposure even if they technically are not part of it.
So, don’t be hesitant to use higher ISO values if the scene requires it. With sports or wildlife, for example, you will take pictures at higher ISOs very often. Although that isn’t ideal, it is better than missing the photo because you’re shooting everything at ISO 100.
This photo, taken at ISO 450, has plenty of details. It would have been too dark at base ISO 100, and this result is absolutely preferable.
ISO is highly technical at the sensor level, but that isn’t important to know when you’re starting out. Instead, just use it like you would expect. Keep your ISO at the base value whenever possible. But, if your exposure (shutter speed and aperture) will not result in a bright enough photo, it is time to raise the ISO. If you follow those suggestions, your photos and image quality will be as good as possible.
The Bucket Analogy
For any photograph, there is only one mathematically correct exposure. However, there are hundreds of combinations of aperture, shutter speed and ISO that can be used to create that exposure. The combination we choose depends on what our artistic vision for that image is. For now, let’s just look at how the three variables in the exposure triangle work together. In my next article, I will talk about how to use aperture, shutter speed, and ISO artistically.
For any given exposure, if one of the three variables change, you must adjust one (or both) of the others in the opposite direction. For example, if you decided to decrease your shutter speed by two stops, you will need to increase your aperture or ISO by two stops. You could also change both aperture and ISO by one stop with the same effect.
As another example, say you increased your ISO by four stops. Then you would need an equivalent decrease of four stops in aperture or shutter speed (or a combination of the two).
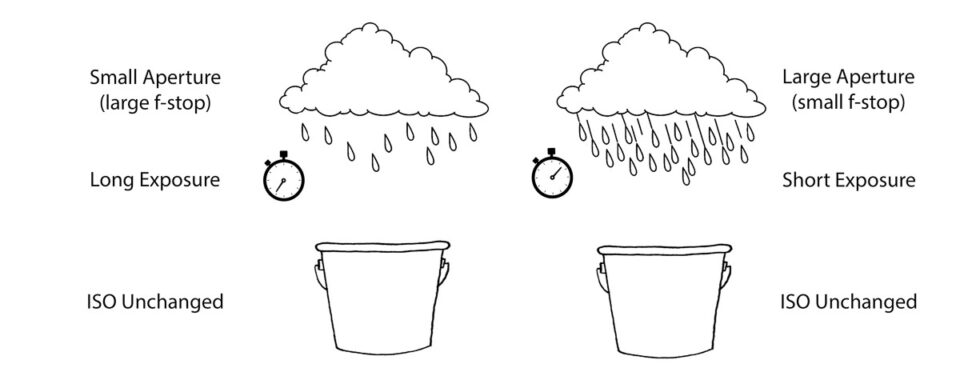
So lets put it all together using an analogy. Instead of light, let’s talk rain. Specifically filling up buckets with rain water. The exposure will be the total amount of water collected. Let’s say our ‘exposure’ is one gallon.
In this analogy, ‘shutter speed’ is the length of time we leave the bucket outside in the rain to fill up. How hard it is raining is our ‘aperture.’ A downpour would be a wide open aperture (large opening, small f-stop number) while a light sprinkle would equate to a tiny aperture (small opening, large f-stop value).
Finally, the width of the bucket represents ‘ISO.’ Now, all our buckets have to measure one gallon to collect the correct ‘exposure.’ However, a very shallow, wide bucket (think very sensitive, high ISO) will fill up much faster than a tall, skinny bucket (low ISO).
There are many scenarios which will collect our one-gallon ‘exposure.’ To make things a bit easier, we will fix one variable, and let the other two change. Let’s start by fixing ISO. If we have two buckets that are the same shape, we could put one out in a downpour for a short length of time to collect one gallon. Or, we could put the other out for a long time during a light sprinkle to collect that same gallon of water. However, if we put the bucket out for a long time in a downpour, we would over expose our image. Water would be spilling out onto the ground! Conversely, putting the bucket out in a light sprinkle for a short length of time would not fill up the bucket. Our bucket would be under exposed.
Here is another scenario. This time lets assume that there is a steady rain. If we have a wide bucket, we won’t need to leave it out for long to collect a gallon of rain. However, if we put out a skinny, tall one-gallon bucket in the same rain, it will take much longer to fill the bucket up.
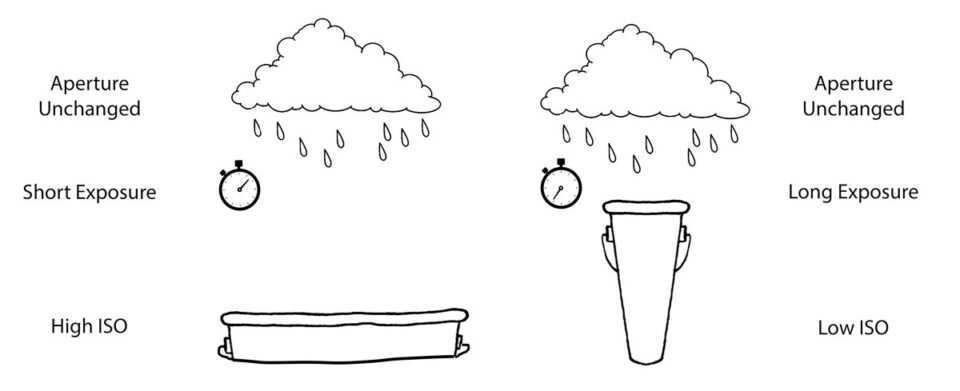
Lastly, let’s fix the time we leave the buckets outside. To collect one gallon of water we could put the wide, shallow bucket out in a light rain. Or, we could put the tall, skinny bucket out in a downpour for the same time to collect exactly one gallon of rain water.
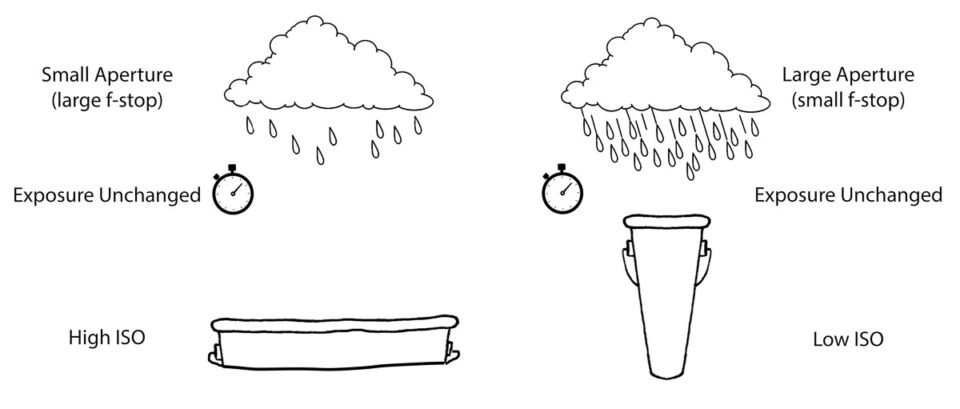
As you can see, there are lots of combinations of ‘shutter speed,’ ‘aperture’ and ‘ISO’ that yield one gallon of ‘exposure.’ Is one combination better than another? Well, that depends on how you want your photograph to look. What is important is the understanding that if you increase or decrease one variable in the exposure triangle by a number of stops, you must make up for that by decreasing or increasing one of the others (or a combination of the others) by an equal number of stops.
Conclusion
A stop is the doubling or halving of the light that makes up an exposure. We can add or subtract stops by changing the aperture, shutter speed, or ISO. So the next time someone tells you that you need to increase your exposure by a couple of stops, you will hopefully know what they mean and how to do it.